BTClock — Quickstart
A 10-minute walkthrough that takes a powered-up BTClock and gets it joined to your Wi-Fi, set to your timezone, and rotating through Bitcoin screens.
If you want the deep dive into every setting, read
HANDBOOK.md once the device is on the network.
This guide targets the two production variants — Rev A (4 MB, 2.13" panels) and Rev B (8 MB, 2.13" panels, with frontlight + ambient sensor). The 8-panel V8 board and the 2.9" Rev A build are out of scope here; treat them as prototypes.
What you'll need
- The BTClock itself.
-
A USB-C cable and a 5 V power supply:
- Rev B (with frontlight): rated for at least 1 A. The 21 warm-white frontlight LEDs (3 per panel × 7 panels) plus the 4-pixel WS2812B ring can pull ~500–800 mA depending on brightness.
- Rev A / V8 (no frontlight): 500 mA is plenty.
Most modern phone chargers exceed both, but the cheap 500 mA wall warts that ship with old USB hubs can brown out a Rev B at full brightness. - A 2.4 GHz Wi-Fi network. The ESP32-S3 radio has no 5 GHz support. - A phone or laptop on the same network for the WebUI.
1. Power up
Plug the USB-C cable in — on Rev B the USB-C port is on the back, on Rev A it's on the side. On first boot you'll see the LEDs run a short rainbow self-test, then the panels paint a provisioning screen showing:
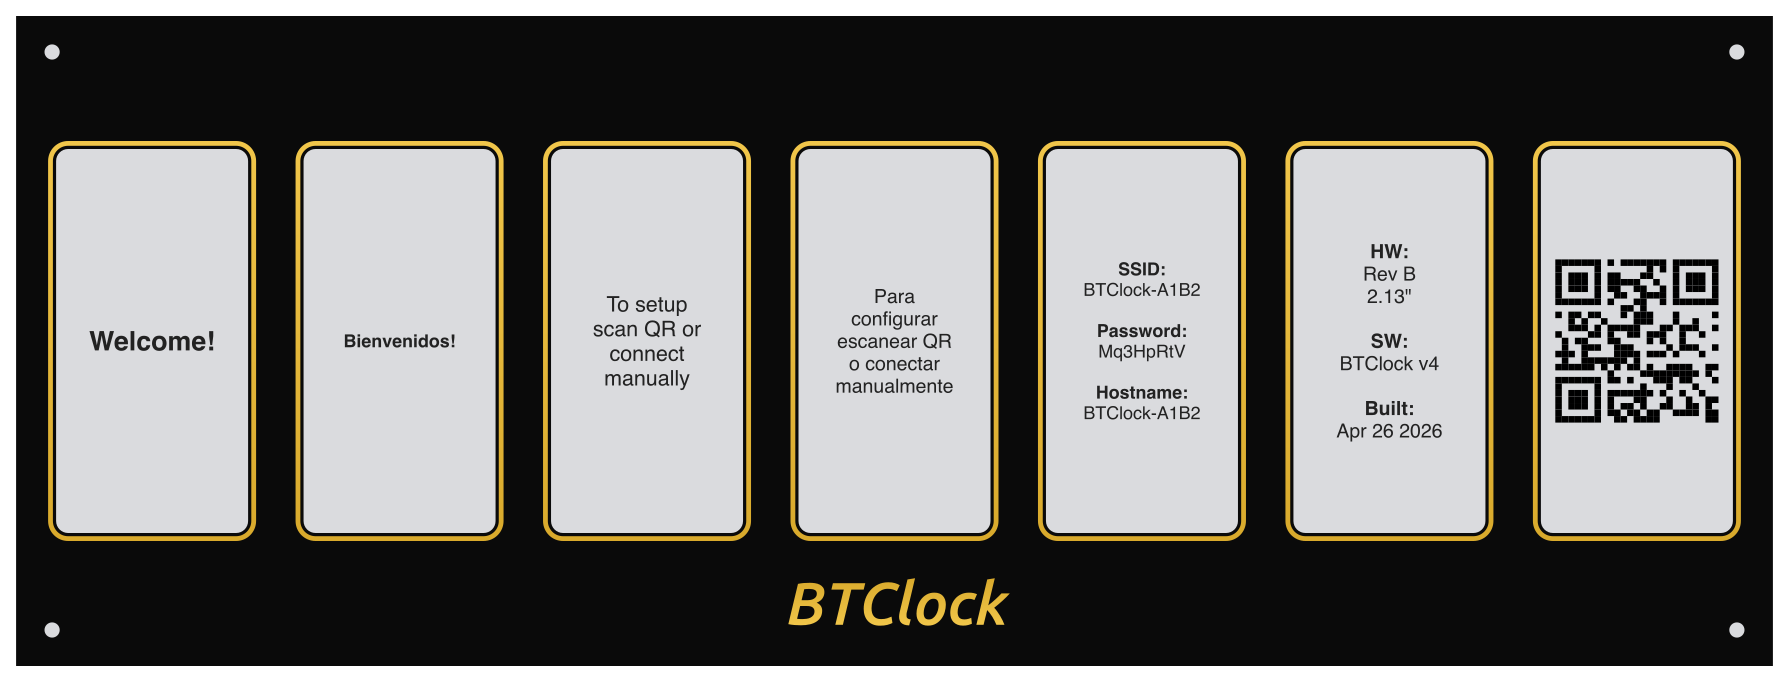
- The hotspot name, e.g.
BTClock-XXXX(the last two bytes of the device MAC, in hex) - A randomly-generated 8-character WPA2 password (mixed case, no
visually-ambiguous characters like
0/O/1/l) - A QR code that encodes
WIFI:T:WPA;S:<ssid>;P:<password>;;
The password is generated once, persisted to NVS, and reused across reboots — note it down or scan the QR.
2. Join the BTClock's hotspot
Scan the QR with your phone (it'll join automatically) or connect manually:
- SSID:
BTClock-XXXX - Security: WPA2
- Password: the 8 characters shown on the panel
Most phones detect the captive portal and pop the join sheet
automatically. If yours doesn't, open http://192.168.4.1 in a browser.
3. Pick your home Wi-Fi
The captive portal lists nearby SSIDs. Select yours, type the password, hit save. The device persists the credentials, reboots, and rejoins as a normal STA client. The provisioning hotspot disappears on the next boot.
If you typed the password wrong, wait wpTimeout seconds (15 minutes
by default) — the device reboots back into provisioning mode so you
can retry.
4. Find the BTClock on your network
Once the device is on Wi-Fi, the panels show the rotation screens. To open the WebUI:
- mDNS — most desktops and Linux machines support it: visit
http://btclock-xxxxxx.local(wherexxxxxxis the lowercase full-MAC suffix, also visible in the WebUI's System info card). - On the device itself — press button 4 (the right-most front
button) to flip the panels into the debug overlay. The first cell
reads
IP:followed by the address; press button 4 again to return to whatever data screen was up.
 - By IP — your router will list the device as
 btclock-xxxxxx in
its DHCP table; visit that IP directly. The IP is also the
Status → System info → IP line once you're connected.
5. Open the WebUI
You'll see three columns:
- Control (left) — push text to the panels, set LED colour, drive the frontlight (Rev B), trigger a firmware update or factory reset.
- Status (centre) — live preview of what the panels show right now, screen-cycle timer, DND state, signal strength, uptime.
- Settings (right) — the long form of everything below.
6. Set timezone and currencies
In Settings → Timezone: pick your IANA zone (e.g.
Europe/Amsterdam). The BTClock and time-based DND windows will track
DST automatically. Saved live, no reboot.
In Settings → Data sources → Currencies: drag-reorder your ticker / sats-per-currency rotation. Defaults are USD, EUR, JPY.
7. Pick the screens you want
In Settings → Screens: toggle each rotation screen on or off, and drag to set the order. The default catalogue is:
- Block height
- Time
- Halving countdown
- Block fee rate
- Sats per dollar (Moscow time)
- BTC ticker
- Market cap
- Bitcoin supply
- Mining pool hashrate / earnings
- Bitaxe hashrate / best difficulty
Auto-rotate cadence is in Settings → Screen specific → Time per screen (default 30 minutes — yes, e-paper is slow on purpose; lower it to 1 minute if you'd rather see motion). The Handbook → Screen catalogue shows what each screen looks like.
8. (Optional) First-day tweaks
- LED colour (Control card → LEDs) — the default is the BTClock
orange
#E04300. The rear LED strip flashes this colour on every new block. - Frontlight (Rev B only — Control card → Frontlight) — pick always-on, ambient-driven, or off.
- Mining pool (Settings → Mining pool) — drop in your pool's user
/ payout-address / API key. Defaults to
noderunnersglobal stats so the screen renders without per-user credentials. See the pool field guide for what to fill in per pool. - Bitaxe (Settings → Bitaxe) — point at your miner's hostname or IP and the Bitaxe screens light up.
- Do Not Disturb (Settings → Do Not Disturb) — schedule a window where the LEDs stay dark; useful in a bedroom. The e-paper itself doesn't emit light, so panel content stays visible.
9. Updating the firmware
Two no-toolchain ways to move to a newer release once the device is up:
From the WebUI (over Wi-Fi)
The Firmware update card at the bottom of the Control column shows the latest release, with two ways to update:
- Auto-update — when the card reports a newer version, click Install update (experimental). The clock downloads and flashes the matching build itself — no files to handle. This path is experimental and doesn't always succeed: if it fails, try once more, and if it still won't take, use the web flasher route below.
- Manual upload — download the release for your board, then under
Firmware file pick the firmware and click Update firmware (and
WebUI file → Update WebUI to refresh the interface). Each
field's label shows the exact filename to use for your board — e.g.
Firmware file (
btclock_rev_b_ota.bin) — so you grab the right one. The firmware rejects a file that doesn't match the board, so you can't flash a Rev B build onto a Rev A.
Either way a progress overlay paints on the panels during the update, and the device reboots into the new version once the checksum verifies.
From the web flasher (over USB)
Use this whenever you like — for a first flash, if a WebUI update won't go through, or to recover a board whose WebUI is unreachable. It talks to the device over USB, so it needs no network:
- Connect the BTClock to your computer with a USB-C cable. On Rev B the USB-C port is on the back; on Rev A it's on the side.
- Open web-flasher-v4.btclock.dev in Chrome, Edge, or Brave (WebSerial is required — Firefox and Safari won't work).
- Click Connect and pick the latest release — the flasher auto-detects your board variant (Rev A / Rev B / V8) and installs firmware + WebUI in one shot.
What's next
- The full reference — every screen, every setting, every API endpoint
— is in
HANDBOOK.md. - A Home Assistant integration is maintained alongside the firmware
(same author) at
git.btclock.dev/btclock/homeassistant-btclock
with a mirror on
github.com/dsbaars/homeassistant-btclock.
Entities for every data screen plus services for screen-push and
LED control. See
HOMEASSISTANT.mdfor the full setup walkthrough. - Questions, bug reports, show-and-tell on the Telegram support channel: t.me/+oPT6SHAu-jA0Nzlk.
- Want to build firmware yourself? See
BUILD_FROM_SOURCE.md.